I'm sort of surprised by this, but that GBA SP I picked up with the non-working backlight is not fixable. I say this is surprising because Nintendo products are built like tanks. There was a news story a few years ago about how a guy's house got flooded and all of his Nintendo consoles (caked in dirt) still functioned perfectly. Do that to an Xbox or a PlayStation and it's done for.
I went out and tracked down a multimeter today, hoping that the problem with this SP was similar to the one that the Russian guy in the video demonstrated. Not so. Also, if you get a cheap multimeter, don't trust the packaging. The package said it tested continuity. It didn't, because it was just a generic backing that this company used for all of the different multimeters they sell. The only way to see the features the one that you actually bought has is to open the blister pack and read the instructions. It wasn't a huge problem, though. I just used it to measure if there was a current actually getting through the ribbon cable to the screen, and there was.
So, that was out. Next I checked the fuses, and they were all fine. So, I decided to just go ahead and bypass the ribbon cable anyways and solder wires between the points where power for the backlight gets to the screen. I already knew there was a current getting to the screen, but I figured I ripped it apart already and it's just two wires. No dice.
We have a genuinely burned out backlight on our hands. It may not necessarily be burned out, but something is going on in the screen that I can't fix. I'm not too heartbroken about it; I don't particularly like the feel of the SP. I'm not too sure what I'll actually do with it, though. There's a couple of options here...
1. Just keep it for spare parts. Maybe I'll come across a screwed up working one some day.
2. Get a replacement screen from a Chinese seller.
I'm sort of entertaining option two. Why a Chinese seller? You can get OEM screens from Taobao for about $20 US. If you buy them from an American seller, it'll be at least $60 and those guys are just getting them from Taobao and adding a premium onto it.
Option two brings up another issue, though. There is a seller on Taobao who makes an adapter so that you can use a GBA SP screen in an original GBA. I prefer the feel of the original GBA way more than the SP. If I'll already be ordering through Taobao, then what's the harm in just picking up one of those adapters?
Then the next step in my thought process is to just buy two replacement SP screens, get the adapter for the fat GBA and then sell the white one on eBay since they're pretty valuable.
Either way, the SP is on the back burner for now.
Saturday, January 18, 2014
Monday, January 13, 2014
Goodwill Find: Game Boy Advance SP
Let me start by saying that I had no idea that Game Boy Advance SPs were still selling for so much when I got this. I would guess this is because you can play original Game Boy and Game Boy Color games on it, with the lit screen. The Buy It Now prices on eBay are all around $30, and they're going for even more than that if they have a game or two with them. So...what did I pay?
$7.99
Granted, this is without a charger, though the original fat DS charger will work with the SP. I made off like a bandit though. It's a plain ass white SP. I figured this was no big deal. I figured wrong.

Seems easy enough, all things considered. If there weren't a million points there, I'd probably just bypass the flex cable altogether. They do use flex cables for a reason, though.
Nintendo doesn't like to make things easy, so they use tri-wing screws in a lot of their products. This means I'll need a tri-wing screw driver. So, that'll be roughly $5 (shipping included) from Nintendo Repair Shop. I'm not too sad about this expense because I'll be able to use it on other Nintendo things I own, instead of just awkwardly forcing the screws out with a flathead.
I wasn't really sure about this purchase at first since the backlight wasn't working. I couldn't confirm it was an AGS-101 either because someone scratched the sticker off with the model information. Since the white one was apparently only AGS-101 and this is potentially an easy fix, I feel pretty good about it now.
If for some reason I can't fix it, then it'll probably be something I can sell off on eBay for a reasonable price (for what it is) since it's apparently a rare variant of the console.
Since I've already got a soldering iron and other necessary parts to perform this fix, it'll cost me a grand total of about $13.
$7.99
Granted, this is without a charger, though the original fat DS charger will work with the SP. I made off like a bandit though. It's a plain ass white SP. I figured this was no big deal. I figured wrong.

You might think this guy is crazy. He isn't. There's 145 people watching the auction.
So...now I've got a find on my hands. It's not in mint condition by any means, it has the kind of scratching you'll see on any pretty well used Game Boy. Since my concern isn't selling it, I'm more than pleased. I'm not wild about the white color, but it should look better cleaned up.
In addition to apparently being a rare color (ooooh white), this also makes it an AGS-101 model. If you've ever been a Nintendo fan, you know they're a bunch of dicks. As far as their handhelds go, the original model always sucks and you can expect to see a better one in a year or two. The GBA was the worst case of this.
The original GBA has by far the worst screen a handheld has ever had. I wanted a GBA so much when I was a kid. I finally got one, and the screen was so bad I couldn't stand playing it. When I got a game I really wanted, I played it. Outside of that though? Nope. So, of course they released the SP. The original model had a front lit screen, with an on/off switch. The AGS-101 was a later model with a genuine backlit screen. The light can't be turned off on this model, with the switch putting the light on high or low.
I did make this purchase knowing there may be a problem, though. The system had enough of a charge to turn it on, but I couldn't get the backlight to come on. I figured this was either because of the battery being low, or because there wasn't a game in the system. GBA SP screens aren't easy to find, because they can be used to mod original GBAs to have a lit screen. I would prefer doing this, really. I like the form factor of the original GBA a lot better. For the time being though, I'm going to stick with trying to get this working.
From what I can gather from some random Russian on YouTube, the culprit of this is often a damaged flex cable (what a shocker). If you read any of the PS2 stuff I've posted, then you know I already hate flex cables with a passion. So, here's what I'll be trying to do to revive this SP:
Seems easy enough, all things considered. If there weren't a million points there, I'd probably just bypass the flex cable altogether. They do use flex cables for a reason, though.
Nintendo doesn't like to make things easy, so they use tri-wing screws in a lot of their products. This means I'll need a tri-wing screw driver. So, that'll be roughly $5 (shipping included) from Nintendo Repair Shop. I'm not too sad about this expense because I'll be able to use it on other Nintendo things I own, instead of just awkwardly forcing the screws out with a flathead.
I wasn't really sure about this purchase at first since the backlight wasn't working. I couldn't confirm it was an AGS-101 either because someone scratched the sticker off with the model information. Since the white one was apparently only AGS-101 and this is potentially an easy fix, I feel pretty good about it now.
If for some reason I can't fix it, then it'll probably be something I can sell off on eBay for a reasonable price (for what it is) since it's apparently a rare variant of the console.
Since I've already got a soldering iron and other necessary parts to perform this fix, it'll cost me a grand total of about $13.
Friday, January 10, 2014
Replacing the PlayStation 2 Slim Laser
Well, today I got the replacement laser ($8) in the mail for my PlayStation 2 along with a copy of Zone of the Enders ($4). Not content with just that, I went to Popeyes because...well..
Anyways, after that I headed to a local game store. Sadly, they had fallen to the pit that every game store falls into since I was there last. A messy store, slowly inflating prices, and employees who don't give a shit about you or the fact that you exist in some form. While I was there, I picked up a copy of Castlevania: Lament of Innocence ($8) and an official Sony memory card ($8). While the official Sony cards are only 8mb and the third party cards get a lot larger, I just don't trust my game saves on a Nyko card or anything like that. So what if the official cards have less space? At least it's probably not going to fuck up. Also, is Nyko even a company still?
Anyways, let's just jump in.
Before I get started, if you choose to use this post as a tutorial and you fuck up, I don't care. I'm not responsible. Don't bitch at me.
Also, sorry about the pictures. My only camera is my phone, and my lense has gotten a bit scratched over the past 4 years.


I'd recommend unscrewing the green circle first. Just lift the part straight up and it comes right off. The two red screws will release the circular rail that the laser slides on, so you can lift the laser assembly. DON'T JUST TRY TO RIP THE WHOLE THING OUT QUICKLY! We still have a flex cable involved, even though we're not tearing out the entire assembly. Anyways, look at where the flex cable connects to the laser. Part of the connector is white. This part is a latch which flips up. You must lift this latch to free the flex cable. Once you've done that, just reverse the steps. Put the flex cable into the new laser, close the latch, so on and so forth.
One note about that flex cable though...


So, the PlayStation 2 was $11.99 and the laser was $7.37 for a grand total of $19.36 (and about 15 minutes of work). Not bad at all when you consider it'll now be working like I bought it brand new, day one. It would've been more, but I already had a PlayStation 2 controller that my girlfriend bought at Goodwill with the PlayStation 1 she gave me. If you didn't know, PlayStation 2 controllers work in a PS1 and the opposite is also true. Obviously I'm not including the games and memory card either. It would be reasonable to me to include the memory card in that cost since it is sort of essential to using the system to its fullest extent.
One thing I've noticed since replacing the laser is that this sucker is LOUD. The fan is quiet, but just the sound the laser makes is really ridiculously loud. It's about as loud as the Dreamcast's laser...which is ridiculous. When I tried playing some PlayStation games on it and a DVD when I first got it, it was pretty quiet. I'd guess this was due to the laser just not working well and thus not functioning to its fullest.
One other thing I noticed is that just because the PlayStation 2 has an optical audio port doesn't mean games are going to support surround sound. I just happened to get two games that don't. Although Castlevania seems to think that Dolby Pro Logic II counts as "beautiful surround sound," I don't quite think that counts.

Anyways, after that I headed to a local game store. Sadly, they had fallen to the pit that every game store falls into since I was there last. A messy store, slowly inflating prices, and employees who don't give a shit about you or the fact that you exist in some form. While I was there, I picked up a copy of Castlevania: Lament of Innocence ($8) and an official Sony memory card ($8). While the official Sony cards are only 8mb and the third party cards get a lot larger, I just don't trust my game saves on a Nyko card or anything like that. So what if the official cards have less space? At least it's probably not going to fuck up. Also, is Nyko even a company still?
Anyways, let's just jump in.
Before I get started, if you choose to use this post as a tutorial and you fuck up, I don't care. I'm not responsible. Don't bitch at me.
Also, sorry about the pictures. My only camera is my phone, and my lense has gotten a bit scratched over the past 4 years.
Good games are at stake...well, I hope they're good games. Also, more on that NES controller later.
To the far left, we have our replacement laser. Just a heads up; these lasers do have different models. I'm going to write this like it's the first time I got into this thing, but it isn't. If you want to replace your laser, you need to open up your console and get the part number off the laser so you can replace it with a similar model. Obvious first things first, let's get into this sucker.
Thankfully, that isn't paint. It's just a sticker. Thanks for your accurate depiction, camera.
This looks troubling at first. I thought it was going to be hard to get into it. Then again, that was a foolish thought because nothing is hard to get into if you've ever done some maintenance on an Apple product. There's actually just plain ass philips screws under those black plastic squares. Now, if you're looking at your PS2, you're probably noticing that there's a sticker covering one of those squares. That's how Sony checked for tampering for your warranty. You'll have to pull the sticker off to get access to the screw. A sticker seems like a pretty simplistic way to enforce your warranty, but that's what everyone still uses.
Easy enough.
There's nothing sticking the squares in place. You can just pop the pieces out with a flathead screwdriver. You should pull up six of these squares. Note that the rubber feet towards the back of the console ARE hiding screws. The two rubber feet towards the front of the console are not. Anyways, everyone and their dog should have a philips screwdriver of the right size to get these out. No problem.
Once you've removed your six screws, just flip the console back over and the top lifts right off.
The only console easier to take apart is probably the Dreamcast. Four philips screws, not hidden in any way.
Before we get all excited about that though, there's something we need to do with the replacement laser. You'll need a soldering iron for this part, but luckily there's no actual soldering involved. These replacement lasers have a point on them where there's soldering connecting some points to prevent static build up. I know this is common practice for Xbox 360 replacement lasers as well.
The solder ball is circled (WOW). Remember when I said you don't need to have any soldering skills? Just heat up the iron and touch it to the solder ball. It'll come right off. If you're not sure if you did it well enough, it should look like a circle with two lines through it when you're done. If you bought a replacement laser, they'll probably have images showing you this on the eBay listing or some external website. Now we're actually ready to put in the laser.
We're not going to waste our time and remove the whole DVD drive, just the laser assembly. There's flex cables, and flex cables are Satan incarnate. Unfortunately, you will have to deal with a flex cable at least once when you're opening any electronic.
One note about that flex cable though...
That's not a dick.
If you didn't notice, that flex cable is glued down. There is a damn good reason it's glued down. If you lifted the flex cable from that metal and undid any glue at all, you really, really need to tape it back down. Why? The slim is SO fucking small, that the flex cable will bend up and scratch the disc if it's not glued down exactly where it's supposed to be. So, yeah. Maybe before you fully reassemble with the screws, just set the top on and put in a shitty CD or something to test it out. I caught this the first time I disassembled it just to get the laser part number and check out the insides.
Anyways, go ahead and reassemble. You should be good to go. Usually, I hit all of my console buys with some Mr. Clean Magic Erasers. This one had someone's name written on it in permanent marker. Of course it's hard to see on a black console, so I didn't even try to take a picture.
I made that. I spent way too long trying to think of something for him to say.
Note that with the magic erasers, you shouldn't clean any part of the console that has a glossy finish. The magic erasers are sort of a gritty, sandpapery type thing. They will scratch glossy parts. The parts that have a matte finish will look brand new, though. If you start getting into collecting "retro" game consoles, magic erasers will become your favorite product.
Anyways, it's time for the moment of truth.
...and it works!
So, the PlayStation 2 was $11.99 and the laser was $7.37 for a grand total of $19.36 (and about 15 minutes of work). Not bad at all when you consider it'll now be working like I bought it brand new, day one. It would've been more, but I already had a PlayStation 2 controller that my girlfriend bought at Goodwill with the PlayStation 1 she gave me. If you didn't know, PlayStation 2 controllers work in a PS1 and the opposite is also true. Obviously I'm not including the games and memory card either. It would be reasonable to me to include the memory card in that cost since it is sort of essential to using the system to its fullest extent.
One thing I've noticed since replacing the laser is that this sucker is LOUD. The fan is quiet, but just the sound the laser makes is really ridiculously loud. It's about as loud as the Dreamcast's laser...which is ridiculous. When I tried playing some PlayStation games on it and a DVD when I first got it, it was pretty quiet. I'd guess this was due to the laser just not working well and thus not functioning to its fullest.
One other thing I noticed is that just because the PlayStation 2 has an optical audio port doesn't mean games are going to support surround sound. I just happened to get two games that don't. Although Castlevania seems to think that Dolby Pro Logic II counts as "beautiful surround sound," I don't quite think that counts.
Time to take advantage of all that (not very) hard work!
Saturday, January 4, 2014
Goodwill Find: PlayStation 2 Slim
(Sorry about the boring layout, I'll make it not suck later)
As far as game collecting goes, Goodwill can be incredibly hit or miss. Some Goodwills seem to have no idea what they have and price things nice and cheap. Others will gouge the shit out of you.
I made a pretty good find last night with a PlayStation 2 slim. Generally, I prefer to have the original models of a console. This can be a risky preference, given that the initial models are usually plagued with problems which are fixed with a re-release. I'm not really sure why I have this preference. I guess because the original models are usually what everyone remembers getting excited about and in my case, it's the model that I usually associate with the games for that system.
This doesn't apply to the model 1 Genesis. You're an ugly piece of shit.
The PlayStation 2 I found was only $11.99. Normally, I'd probably pass on it because I've never had a PlayStation 2 and I'm not terribly familiar with the hardware and repairing it, the pros and cons of the different models and the fact that it's not the original model. On the other hand, I've never had a PlayStation 2 and I have a job now. I tried to pick up a game to go with it so I could test it out, but the only one I found that I wouldn't mind having was too scratched up for me to want to buy it.
Before I get into that, let's talk about some of the other consoles from that era and some things that I like about this system. The first thing that jumped out to me was the inclusion of an optical audio output for surround sound.
No other consoles from this era had optical ports without an adapter.
Since I recently got a nice surround sound setup, this was a big deal to me. Surround sound makes games much more immersive, especially action games. The Gamecube, Xbox and Dreamcast all lacked any kind of optical audio output.
The Gamecube was incapable of true surround sound; it supported Dolby Pro Logic II, which is a stereo audio signal carried over the standard red/white audio plugs with a single rear channel matrixed into the L/R channels.
The Xbox was capable of true surround sound with Dolby Digital 5.1. The downside of this? They went through the effort of including this, but they didn't include an optical out on the back of the console. You have to buy a special media adapter to go into their proprietary port on the back. Microsoft released a few of these, and I haven't found one (outside of ebay) that is capable of optical output and component video (for HDTVs).
The Dreamcast was never even intended to support surround sound. Oddly enough, when Sega released the last SDK (software development kit) for the Dreamcast after they had already announced they were no longer making the system, it included support for Dolby Pro Logic.
Optical audio ports were still sort of an oddity until recently on game consoles. The original Xbox 360 didn't include an optical audio port (although the models which included component cables in the box had optical ports built into the cables). Nintendo continued their Gamecube habits with the Wii and didn't offer a full surround sound experience. Sony stayed on the ball though, and carried over this aspect of the PlayStation 2.
There is one small detail that I really like which shows someone at Sony was paying attention to the design of the PS2, even if it came out looking like someone at Atari in 1982's idea of a game console from the future.
The console is designed so you can set it on its side, or stand it up. That PlayStation logo right there can be turned so that it faces the right way depending on which way your console is sitting. This is a picture of the original PS2, but it applies to the slim as well.
While I'm ecstatic about the optical audio port and the turning logo, there's a lot about this system that I don't like. Mostly, it's the size. It's about the size of two DVD cases stacked together, little wider and an inch and a half or so taller. Besides this, it's light. Really light. It's light and small enough that I'm worried it'll be pulled off of a shelf really easily during a game.
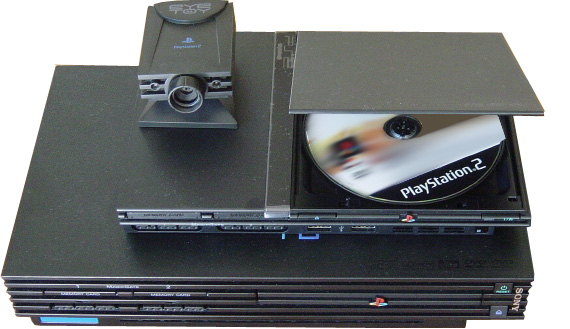
This bothers me, but the biggest sin is this...
The lid flips open. It doesn't have a tray that ejects like the original PlayStation 2, it just pops open like the PlayStation 1. Not only is this ugly and shitty, but it limits where I can put it in my entertainment center since it opens to the left. I was trying to see if there were any marketing shots that Sony released which showed the lid open, but there aren't any. They knew it was ugly and shitty, too.
For a Goodwill find, this console was in pretty good shape. While I'm too lazy to take pictures of it now, it does need a tiny bit of cleaning. When I opened it, the system was pretty clean inside, with hardly any dust. It either wasn't used very much, or disc read errors lead the previous owner to try to clean it out with compressed air.
I tried testing it out with some PlayStation games, but it kept freezing up on load screens for most of them. The system played a DVD fine, but I'm still going to get a replacement laser for it. So, once that shows up, I'll take some pictures of mine and document the process of replacing the laser.
That's all for now!
Subscribe to:
Posts (Atom)